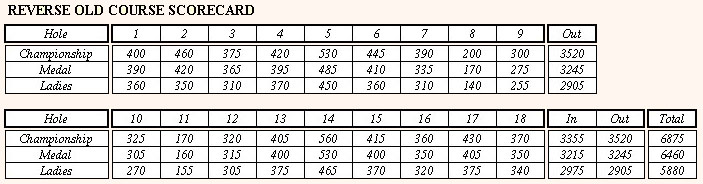
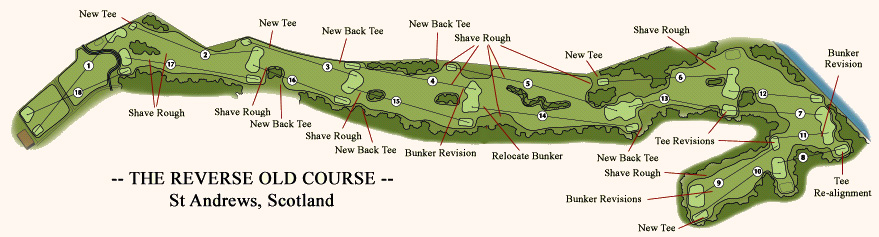
The Reverse Old Course
by Jeremy Glenn
The Old Course at St. Andrews is the home of golf, and without a doubt one of the most famous and greatest golf courses in the world. However, very few realise that up until quite recently – from the perspective of a golf course over 500 years old – golfers were able to play two courses. The first is the Old Course as we know it today. The second is the Reverse Old Course, where one essentially play backwards – or ‘clockwise’ – starting on the first tee and playing towards the 17th green, then to the 16th, and so on until returning home, playing from the 2nd tee to the 18th green.
While the greatness of the current Old Course is well known, those familiar with the Reverse Course are of the opinion that this second course is at least as good as the Grand Old Lady, if not better.
Let’s take a look at this lost treasure, and see for ourselves.
The Routing
The actual routing of the Old Course is perhaps one of its most controversial design feature. As it is played now, more than a long corridor, the Old Course is really nothing more than a elongated figure ‘8’ (more accurately an ‘8’ that has been folded in half). Some praise its simplicity, functionality, and quirks. Others denounce those very same quirks, or its monotonous linearity and dubious safety considerations. Whatever is said, however, it is certainly unique in golf.
Yet it is in large part due to its simplicity and linearity that in can be played both ways. As is well known, most greens serve a double function, with two flags being each approached from opposite directions. Furthermore, the vast treeless landscape along the coastline, combined with the close proximity of tees and greens, allows the golf course to be seen as one core entity, rather than eighteen seperate components.
The Old Course as we know it today, which we’ll call the Original Course, is played in a counter-clockwise manner, going out on the right side of the corridor and returning down the other side (much like driving your car on North American roads). The other course, which can be called the Reverse Course, is played backwards, going up the left side instead (as you’d do when driving in England).
This two-sided way of playing works with delicious simplicity for most of the holes. It is only at the first and eighteenth for the Reverse Course, the fifth and 13th holes of the Reverse Course, and in the area known as ‘The Loop’ that conflicts can occur.
Let’s study each those areas.
The first and eighteenth hole of the Original Course work quite well – albeit within a rather narrow corridor. However, for the Reverse Course, we are immediately faced with an abnormality. Leaving the first tee and driving to the Original 17th green works well enough, and creates arguably a better hole than the Original first hole. However, upon returning, we realise that the Reverse 18th (from the Original 2nd tee to the 18th green) crosses the path of the Reverse first hole. On any other golf course, and according to any of the so-called rules of design, this would be unacceptable. But this is St.Andrews, and a simple descriptive text such as this one cannot do justice to the manner in which this course has become so great in large part because it invariably breaks all the rules. Without having seen and lived the Old Course, one would not believe that intersecting golf holes could work. But one can rest assured that this crossroad will become – as it perhaps once was – another one of St.Andrews’ quirky charms.
From a design perspectve, the possibity of building a new first tee at the opposite corner of the property – to the right of the 18th green – would seem at first to be a possible solution to the cross-over issue. However, I believe this would create seperate and perhaps more important safety concerns between the two holes and the out-of-bounds, and would use-up a sizeable area of the 18th green. Furthermore, the unforgettable and momentous first shot under the shadow of the historic R&A clubhouse would be lost for the Reverse Course. The first tee has a certain presence and pride to it that should be maintained for the Reverse Course.
And interestingly enough, historical records are sketchy and conflicting as to the true layout of the Reverse Course. Many claim that the 1st, 2nd, 17th and 18th hole played the same way for both golf course, and the ‘reversing’ really only began on the third tee. Yet even if that were true, I find these ‘new’ first two holes of the Reverse Course too great to miss. As such, perhaps autocratically, I have chosen to portray the Reverse Course in such a manner.
The green of the 5th and 13th hole is another area where in reality things don’t run as smoothly as in theory. With the 5th and 13th being one behind the other, rather than side-by-side, playing the theoretical Reverse Course would require that players hit over the flag of one hole to reach their own target. Thus the simplest – and perhaps only – solution to this safety concern is to keep the green numbering as they are now. In other words, the 5th green will be the 5th for both the Original Course and the Reverse, and the 13th green will always be the 13th.
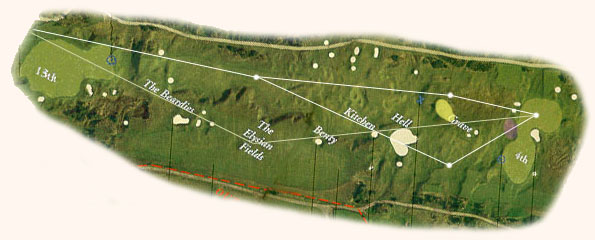
As for ‘The Loop’, comprising of holes 7 through 12, it is quite possible that the Original holes 8 through 11 are in fact part of the old Reverse Course. Indeed, I have yet to find indications on older plans of the infamous cross-over at holes 7 and 11. Nevertheless, whatever the reason of its existence, The Loop works quite well for the Original Course. However, the cross-over and the location of the various tees and greens in that area presents quite a puzzle for the Reverse Course.
In theory at least, the Reverse Course should be played as such:
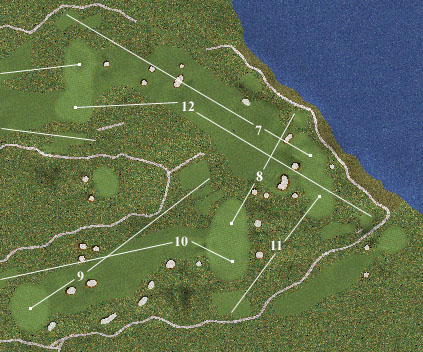
However, it is obviously a total mess. The Reverse 8th tee sits in front of the 7th green. And there are several cross-overs: holes 7, 12 and 8, holes 9 and 10, and holes 11, 12 and 8. Basically, such a routing would be largely impractical and dangerous. Unfortunately, claiming as we did earlier ‘But this is St.Andrews’ can only hold so much water, and isn’t a good enough explanation to help us out of this one…
The Reverse 7th hole, towards the Original 11th green, makes sense and works reasonably well. The green complex should in fact make it a very good hole. The Reverse 9th hole, generally speaking, also fits in quite nicely. As for the Reverse 10th hole, a new tee on the left side of the 9th green would do away with the cross-over. This has the added benefit of making the Reverse 10th a more interesting hole towards the Original 8th green.
This leaves us with the problematic Reverse 8th, 11th and 12th holes.
There are two options for the location of the Reverse 8th tee. The first is in the area of the Original 12th tee, as the theory would indicate. Yet this would leave the Reverse 8th playing across the Reverse 7th and 12th holes. Feasable, but far from ideal. The second option is to leave the 8th tee where it is now: playing from the Original 8th tee to the Original 10th green. From here, it would be just as interesting a hole, though much safer .
There are also two options for the Reverse 11th tee. The first, obviously, is to use the Original 9th tee, as shown above. The second option, which might create a more interesting hole, is to play from the Original 11th tee. This would also get the Reverse 11th it out of the way of the Reverse 8th hole assuming the latter is to be played from the Original 8th tee.
Finally, the Reverse 12th tee could also be located in two areas. The first would likely be in an area left of the Original 8th hole, between the Original 8th and 9th tees, to avoid hitting over the 7th and 11th green. This would create an very interesting hole, but would still be quite dangerous, playing across Reverse 8 and 11, and directly towards the Reverse 7th. Alternatively, one could use the Original 12th tee, as illustrated below. Perhaps not as interesting a hole in itself, but one that fits into the routing much more smoothly
The last item to reconsider, due to the above revisions, is the location of the Reverse 7th tee. As safety is a concern between the Reverse holes 7 and 12 – as it certainly would be on any other course – one could easily use the Original 6th tee instead. There is ample room in that area to expand that tee complex and use it for the Reverse 7th and Reverse 13th.
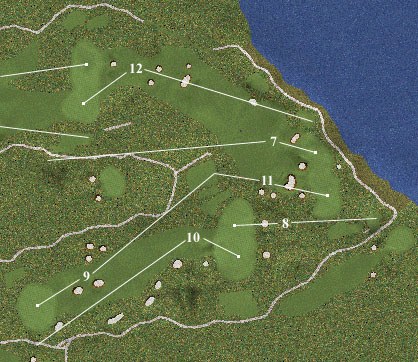
In my opinion, this is the best solution for ‘The Reverse Loop’. It combines the most interesting holes with the safest corridors of play, using the maximum number of existing features to their best potential.
Hole 1
The first hole, at 400 yards, plays from the existing first tee to the existing 17th green. From the tee to the red dot it’s 270 yards, and to the green dot it’s 305 yards.
Once again players have one of the widest fairways in golf to hit into, a somewhat comforting thought when confronted with the nerve-racking task of playing at St.Andrews. Not only is the fairway wide, but it is also free of hazards. In fact, it is only for the power hitters that the Swilken Burn will come into play, especially the further a players drives towards the left side. Here the Burn is within an easily reachable 270 yards at it’s closest point (the red dot).
Yet, as it so often happens at St.Andrews, there is a definite decision to be made for the tee shot. Due to the angle of the green and the ominous Road Hole Bunker, approaches coming in from the left side of the fairway are much easier, as they can be run up the throat of the green with a mid to short iron. Of course, care must be taken to avoid killing the ball’s bump-and-run effect on the upslope of the existing 18th tee. For the tee shot, however, this option not only brings the Swilken Burn into play, but the Out-of-Bounds left looms larger and larger as you try to give yourself a more favourable angle in.
The safest play off the tee is to hit towards the fattest part of the fairway. But hitting – and holding – the green from this position becomes quite a challenge, the target being pinched between the Road Hole Bunker and the road itself. This is especially true downwind or if the ball happens to get a forward kick off the downslope of the bunker.
Of course, if the pin is towards the front of the green, the bunker is no longer in play, and the slopes of the existing 18th tees seem to funnel the ball towards the flagstick. As such, as conservative tee shot to the right side might be best used on those days, leaving an easy run-up approach to the pin.
Recommended Revisions
– No revisions necessary.
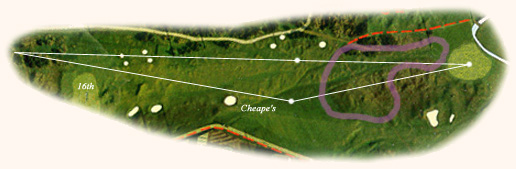
Hole 2
You’d better be well warmed-up by the second tee to be rewarded with a four on this hole. Measuring 460 yards, it plays from the right of the existing 17th green to the existing 16th green.
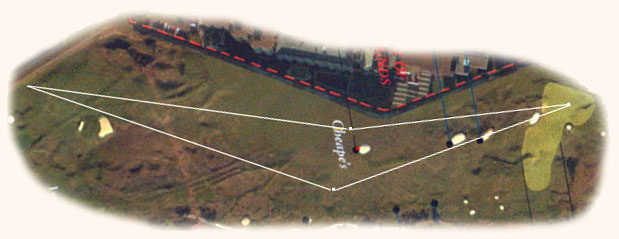
The tee shot is similar to the first, as it pursues the general theme at St.Andrews of staying in the middle for safety and flirting with the property lines for an advantage. You’d want to avoid landing in Cheape’s bunker (red dot on map above) staring at you 275 yards away, but apart from that the real decision for you is how straight a dogleg do you want the second to be.
Obviously, staying well away from the out-of-bounds is the safest play off the tee, and you’re provided with plenty of room to do so. However, the further right you go, the more likely you are to take five strokes to handle this hole. Such a drive will leave you with well over 200 yards to the green, with a trio of bunkers between you and the flag, the closest to the green giving you the most problems. The most aggressive and difficult play from there would be to run the ball up the length of the double green – over the countless humps of the existing second green – with a low draw, and threading it through the bottleneck between the two green-side bunkers. More cautious would be to roll it onto the 16th green (the existing second), and hope for a good lag putt, a two-putt being quite a feat.
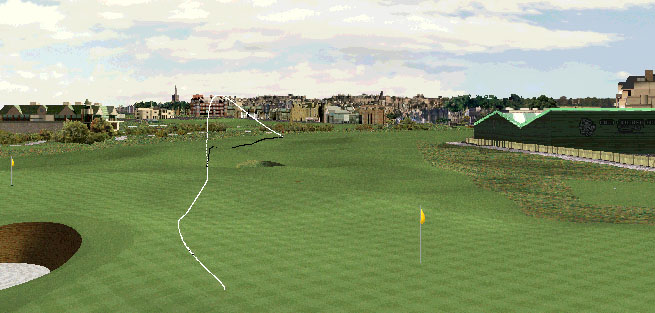
If you were to attack the hole from the tee, you’d aim for the gap between Cheape’s and the corner of the wall (the Corner of the Dyke?), perhaps staying just short of both. Indeed, the farther you drive, the more the out-of-bounds creeps into play. You’d be stymied behind the wall and the shed should your tee shot leak a hair left, and you’d be ‘hitting three’ should it leak even more. But a good drive into the slot will leave you with a mid-iron to the green. From there you can hit a high approach over the bunker, come in from the left side with a well-judged fade, or perhaps bounce on and through the flat mesa of the existing 17th tee when the hole in the far corner. In any case, getting a four is a much easier task then coming on from the right side, but it can only be done after a courageous tee shot.
Essentially, there are two entrances to the green, as seen below. Whether you come in high from the left or low from the right depends on the hole location, the wind, and your strategy off the tee.
Recommended Revisions
– Construct a low-profile tee complex behind the Reverse 1st green (in the area to the right of the original 17th).
– Trim back rough to the right, between the Reverse 1st green and the Reverse 17th fairway.
Hole 3
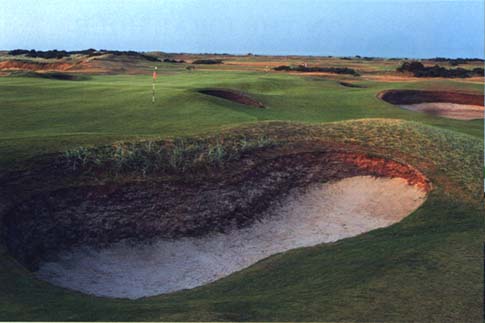
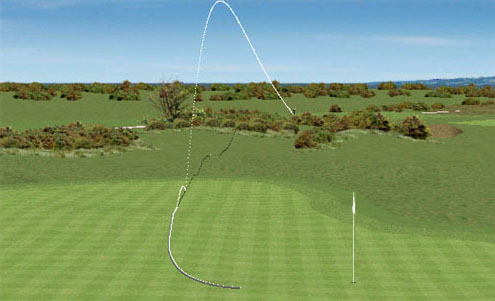
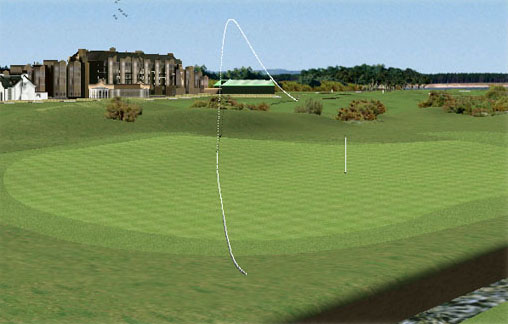
The third at the Reverse Old Course is the shortest yet, measuring 375 yards from the back tee, playing from the Old Course’s 17th tee to its 15th green. It is also unlike most other holes, in that the running approach is severely impeded by an assertive guardian that answers to the name of Cartgate. Impeeded, although not impossible.
Off the tee, the landing area is quite generous, 210 yards over the Principal’s Nose and short of another small, blind pot bunker 290 yards away. For the good player, the task is quite simple – or at least quite simple to describe: drive it over the right corner of the Principal’s Nose into the heart of the fairway, then hoist a short iron high over the 7-foot-depth of Cartgate to stop dead on a green falling away from you. This, in most conditions, would seem to be the best way to play this hole, and proper execution might reward the player with a 3.
The shorter hitter, who might not think himself able to carry Cartgate and stop the ball at will, is given the opportunity of bumping onto the green from the left. But to do so he must drive by the left edge of the intimidating Principal’s Nose, hugging the out-of-bounds. Anything safely to the right not only lengthens the hole, but also brings Cartgate more and more into play. Being really conservative in such a case, one could then run it up to an area short-left of the green, and hope for a good chip.
Driving to the extreme right side in the hopes of drawing around Cartgate from that side may at first seem like a clever idea. But doing so can bring some right-side pot bunkers into play, Cargate never really gets out of the way and approaches get deflected away to the right, leaving a long putt to stay in the game. For a good putter or the high handicapper, though, running onto the Reverse 15th green could well be a safe route from tee to green, especially on days when the flag is towards the right.
The direction of the wind will have an important bearing on your decisions. Downwind, it would be quite easy to carry the Nose, from which point you’d run it up to the putting surface. Into the wind, it is both tougher to carry the Nose and easier to stop the ball on the green. Staying in the middle and lobbing it over Cartgate would then be the strategy of choice.
To sumarize, while it may not be the most strategically complex hole at St.Andrews, it still requires good thinking and execution. There are two bunkers that define strategy: Cartgate and the Principal’s Nose. To get onto the green in two shots, you must challenge at least one of them. Which one, of course, is up to you.
Staying away from both will likely cost you a stroke. But landing into either could easily cost you more.
Recommended Revisions
– Construct a low-profile forward tee behind Reverse 2nd green (short-right of the original 16th), along the property line.
Hole 4
If play at the third hole was dictated by two imposing bunkers, the fourth hole’s strategy is determined by two tiny bunkers. By their size, both should be easy enough to avoid. However, they command your attention due to the fact that they sit precisely in the way, buzzing in your head like a mosquito you can’t swat.
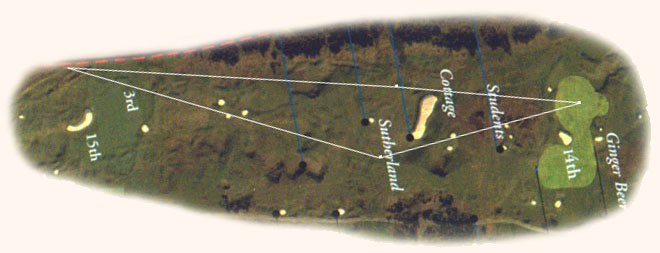
Playing at 420 yards, a new back tee would be constructed about 30 yards behind the forward tee of the original 16th hole. From this position, players will face a wide landing area, all but closed off at the far end by the wide Cottage bunker, sitting 275 yards away. Discreetly, 25 yards in front of Cottage sits our first little friend, Sutherland, right in the middle of the landing area. So small, you probably wouldn’t see it unless your ball happens to find it first.
The question is therefore to drive to the right side or to the left side?
Staying to the left of Sutherland, especially when the hole’s to the right of the green, may be the play of choice. And to do so you’d stand on the tee and drive straight towards the flagstick, perhaps with a 3 wood or long iron for the power hitters. The shortest distance is a straight line, so to speak, and the tee shot would be quite simple. For a good player, this would leave a short iron to the green, over some heather and rough. That’s when you would notice our second friend, a pot bunker protecting the front-left half of the green. Since you are on the left side of the fairway, that bunker sits, from your angle, pretty much right in front of the green. You’ll want to make sure to carry this bunker now, but that’s the price to pay for going straight for the green. Then again, you may wish to run the ball up to the right of the bunker, but a false-front set at a left to right angle may kick the ball further right. Or, for the high handicapper, you could certainly run it up the existing 15th fairway towards the front-left of the green, then chip it on.
On the other hand, from the tee, taking aim at the players standing on the Reverse 15th tee would keep you to the right of Sutherland. There is a good bit of room on that side, even though some mounds short of the landing area make it a slightly more awkward target to hit. From this right side, however, the green-side bunker seems to have conveniently moved aside, opening up the approach to the green for an easier shot, even though it would be about one or two clubs longer. Furthermore, the false-front of the green is now facing directly towards you and thus can be used to ‘kill’ the ball before having it trickle on. A large mound to the back-left of the green is now in line with your shot from this angle, and could help slow down any overly enthusiastic approach.
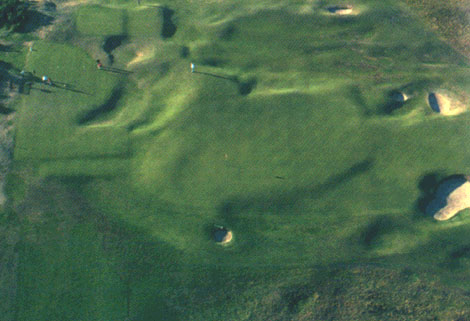
You can see the green’s defense quite well in the picture below. The bunker and the ‘false-front’ combine to protect the green from the left side of Sutherland, but the green opens up nicely from the right side. The key is to fly the ball to the front of the green, and make sure it stops quickly. The green falls away sharply in the back if you go too far.
Recommended Revisions
– Construct a new back tee to reduce any feeling of a ‘forced lay-up’ to Cottage.
– Revise existing tees to accommodate views from the back tee towards the fairway.
– Trim back rough to the front right of the green (between the green and the Students bunker) to accommodate run-up shots.
– Consider a slight expansion of front-left green side bunker into a more imposing and visible hazard.
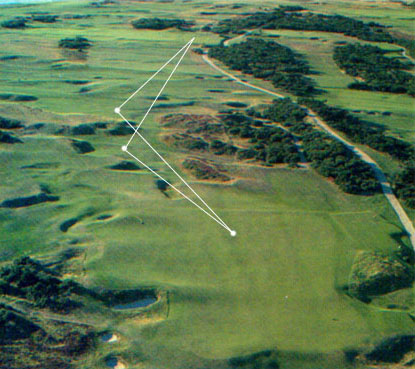
Hole 5
The theory of the Reverse routing must give way to practicality on the 530-yard fifth hole. According to this theory, one would have played from the existing 15th tee towards the 13th green. However, as we all know, this 13th green is set behind the existing 5th, rather than to the left of it. As it would be dangerous and thus impractical to hit over another green complex, the 5th green of the Old Course will also serve as the fifth green for the Reverse Course. At least the way I’m routing this thing.
Yet the Reverse tee for this hole is nearly 150 yards to the left of the original tee complex. This has a dramatic effect on the overall strategy and playability of not merely the tee shot, but of the second and third shots as well.
Drawing a straight line from tee to green, one would quickly find that this ‘line of instinct’ runs precisely the length of the sharp fall-off that separate the fairways of the 5th and 14th holes. As such, one must decide whether to take the High Road (through the Elysian Fields) or the Low Road (down the Reverse 14th fairway). Either way, due to its length, only the best golfer will be able to get a four on this hole.
The carry, from a newly-constructed back tee to the Elysian Fields, would be 230 yards. This will lead the player to a flat landing area that is a manageable 50 yards wide, between the out-of-bounds to the left and Benty bunker to the right. Once past Benty (275 yards) the width of the landing area expands to an even more generous 70 yards. After a good drive, the player is then left with three choices. ‘Corking one’, as they say, will allow the player to carry the Spectacles and run it up as close to the hole as possible. The shorter hitter will need to give up some ground however, and once again will choose between staying left on the High Road, or heading to the Low Road, short of the Spectacles. Essentially, you’d want to avoid the Beardies – a nasty group of bunkers – and the deep rough and heather in a low area short-left of the green.

Hitting up the flat expanse of the Elysian Field with a mid to long iron would be a good play when the wind is coming from the right or when the flag is cut on the right side, especially the front-right where it often is. It is quite a straight-forward shot, and will leave you about 100 yards to the green, coming in at a sharp angle from the ‘line of instinct’. From there, you will have a great view of the green and the flag, although you will need to hit over some heather and a few pot bunkers to land on ground falling away from you. But with plenty of the ‘football-field’ green between you and the hole, it shouldn’t be too tough a task.
On the other hand, hitting your second shot down to the Low Road, short of the daunting Spectacles, would seem to be the more instinctive choice, even more so when the hole is anywhere near the left-side bunkers. From there, you’ll be left with as little as a pitch or as much as a full mid iron, depending on the hole location and the ever-present wind. Yet this blind or semi-blind shot, with some severe rolls and dips short of the green, can be quite tricky if you’re trying to make your four.
Taking to Low Road off the tee will make the 5th hole of the Reverse Course play essentially the same way as its twin on the original Old Course, albeit with a little Hell thrown into the mix. While an easier target for your drive, it reduces your options for subsequent shots. You’d need a 220 yard carry to reach the landing area, while avoiding the dreaded Seven Sisters to the right of the fairway. ‘Hell’ is not as penal when your playing ‘backwards’ towards the 5th green, but those seven little pot bunkers to the right will cost you a shot and make the 5th hole much longer than it already is. From the landing area, you’ll then be playing the hole much in the same way as it plays now, with two choices available: rip one over the Spectacles to get near the hole, or play conservatively short of them for the same semi-blind approach as described earlier.
Recommended Revisions
– Construct a new back tee 50 yards behind existing 15th tee complex, atop of the small ridge and hard against the property line.
– Trim gorse bushes and revise existing tee complex as necessary to ensure good visibility to the landing areas.
– Consider trimming back rough a few yards near second landing area in Elysian Fields for a more inviting target.
Hole 6
The 6th hole, at 445 yards, is nearly 100 yards shorter than the previous hole. Much like the 5th, however, the main requirement is a good carry from a new back tee. And, much like the most of the holes we’ve seen to date, well-placed hazards – these particular ones are appropriately named ‘The Coffins’ – sit precisely where you’d most like to hit that drive. As such, you can either stay to the left of them or go around them from the right side. The shallow green – the first bunker-less target of the round – has a pronounced tier running across the green and falling away from you, making it a very elusive target for a long approach.What this hole is all about is one of three choices: A very demanding drive, a very demanding approach, or a quite-acceptable five.
Reaching the left fairway can be a very demanding tee shot. 240 yards of carry and a fairly narrow fairway between The Coffins to the right and gorse to the left. However, the reward is a mid-iron second shot from a flat lie, and an unobstructed view to the flag.
Reaching the wider right side is an easier task, though still requiring a 210-yard carry . Not surprisingly, there is a trade-off. Indeed, this side features a number of rolls and hollows throughout the landing area, and the approach will be a semi-blind 200-plus yards long iron or fairway wood over menacing gorse bushes to a target set at an angle. A severe plateau in the green can produce some odd bounces coming in from this angle. Obviously, the conservative play from the right side would be to lay-up short of the green or to run-up towards the Reverse 12th hole, although either way you’re likely to be giving up a shot for your timidity.
Essentially, the strategy is black and white. There is not ‘bite-of-as-much-as-you-can-chew’ shades of gray. If you can carry your usual tee shots 240 yards – not a problem for today’s good players – you go left without even blinking. If not, you go right and for all intents and purposes play for a five. Of course, such strategic setup for a hole may seem quite laudable, and indeed it certainly has merit. Yet I just don’t intend to give it too much credit because most golfers really don’t have any option. While there are two ways to play this hole, most golfers have only one way which, for them, makes any sense.
It is only a small segment of golfers – those who think they can hit it 240 – that must make a choice. And for them I’d say that the advantage of the left-side fairway still isn’t enough to lure them in that direction, so they probably would stay right as well.
Nevertheless, the Reverse 6th hole does present yet another type of strategy, dictatorial rather than elective. Most of the previous holes let the golfer make the decision, luring them this way and that. Here, on the other hand, the hole is clearly segregating the golfers, saying: ‘You, go here; and you, go there‘. The onus is on the golfer to know which group he or she fits into. This new type of ‘strategy’ thus adds to the Reverse Course’s variety.
Recommended Revisions
– Construct a new back tee near the edge of the Elysian Fields.
– Trim rough in front of green, to connect existing fairway with the green surface.
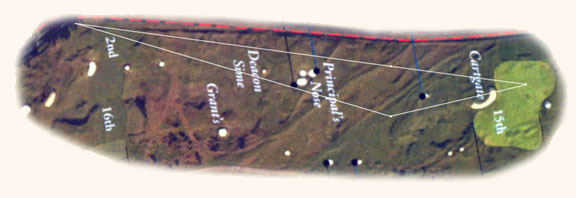
Hole 7
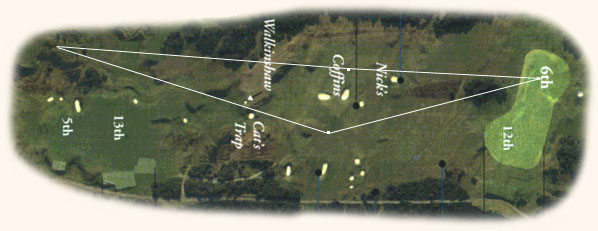
The 7th hole of the Reverse Course is where some serious questions arise as to the best layout for the Reverse Course. Indeed, as our study of the routing has shown, the theoretical flow of the Reverse Course, which has been until now beyond reproach, grinds to a confused halt after the sixth hole. Not being one to shy away from controversy, I came to the conclusion that the Reverse 7th hole would be best played from the existing 7th tee, rather than from the existing 13th tee. Although the walk up to the tee would be a little longer, I thought that the safety consideration outweighed any minor drawbacks from this revision. By and large, the strategy and interest of the hole, towards the existing 11th green, remains unchanged.
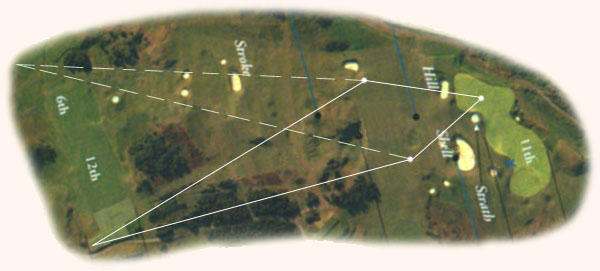
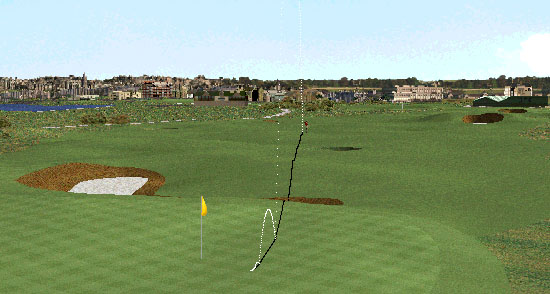
More than anything else – from whichever tee you end up using – your drive is determined by the location of the flag. If it is cut to the right, behind Strath, then by all means stay well left. On the other hand, when it is cut to the left of the green, next to Hill, you’d be well advised to keep to the right.
Essentially, what you want to avoid as much as possible, on any other hole as much as this one, is to be faced with the intimidating task of hitting your approach shot directly over some of the most infamous cavernous bunkers at St Andrews.
If your opponent just shanked his tee shot into the nearest gorse bush, the conservative way to get a four would be to hit it about 225 to 250 yards down the middle of the very wide fairway, perhaps a hair to the right of the large mound, thus leaving yourself with a wedge that you’d hit to the fat of the green. All in all, it’s a very straight-forward play, and one that would serve most golfers very well on most days.
However, as with any great hole, things get more interesting when you start playing the angles to try to give yourself a better line for your approach in hopes of shaving a stroke.
When the hole is cut to the right, behind Strath, you’ll notice that approaching the green from the far left side of the fairway allows you to run it up the length of the green. While you still need to flip it over Hill, you have a lot of green to work with. There is no need to get cute. Let the slope of the green feed it to the hole. But to get to this enviable position for you approach, you will need to get a little cuter with your tee shot. A bunker that has very little use on the Old Course sits at the left edge of the fairway, 250 yards from the back tee. You want to hit it as close to it as you dare..
When the hole is cut to the left side of the green, next to Hill, you’d then want the chance to run it up the generous gap between the bunkers, which can only be done from the right side of the fairway. This requires a 230 yard carry over gorse bushes, and even flirting with a few little pot bunkers in front of Shell.
Once on the green, all you are faced with is one of the most treacherous greens at St.Andrews…
Recommended Revisions
– No revisions necessary.
Hole 8
As with the previous hole, I have decided to disregard the theory of the Reverse Routing and opted to use the existing 8th tee rather then the existing 12th tee as the starting point for this hole. From the existing 12th tee, the setup would have been awkward and dangerous with regards to the neighbouring holes, and the hole would have been totally featureless.
Even so, the eighth at the Old Course is arguably one of the course’s most ordinary and uninspired holes. Not a bad hole, just an average one amidst some of the best in the world. And perhaps unfortunately, albeit appropriately, its twin on the Reverse Course presents the same features – or lack thereof. Playing from the existing eighth tee towards the existing tenth green, the player is faced with essentially the same shot on either course, albeit at nearly 200 yards from the new back tee, it isn’t always easy to reach and then hold the putting surface. Of course, while the hole is rather ‘plain vanilla’ in terms of look, strategy and character, it demands nothing more and nothing less than a well planned and solidly struck golf shot.
The play, as Lee Trevino once put it, is to ‘land the ball like a butterfly with sore feet’ after a long carry. While this task is manageable enough on a calm day, it becomes an imposing challenge when the wind picks up. Into the breeze, from the back tee, most player will need to reach for the top of the bag and use as much as a 3-wood or driver, tools with which accurately hitting a green is never easy. Downwind, stopping the ball quickly, even with a short iron, can be next to impossible. All in all, it’s better to be long than short. The area behind the green is one of short grass and flatter lies (notwithstanding a pair of sharp swales back-centre), whereas in front of the green it is quite the opposite scenario.
The green itself befits the hole, as it is essentially large, flat and featureless. If you rise up to the task presented to you on the tee, you could very well score a two.
Recommended Revisions
– Minor revisions to the tee so that its alignment doesn’t visually favour one hole over the other.
Hole 9
As the theory would indicate, the Reverse 9th hole would play from the existing 11th tee towards the existing 9th green, one of only four single greens on the course. The green will sit about 300 yards from a newly constructed back tee next to the Reverse 8th green.
Unfortunately, strategically and visually, from this setup, the hole is rather weak. Some say that the flatness of the green and the lack of visual clues make for judging your pitch a challenge. And certainly Boase’s and the End Hole bunkers sit in the middle of the fairway, but there is plenty of room to avoid them. All in all, there really isn’t much to worry about, as you are likely to make no better than three and no worse than four.
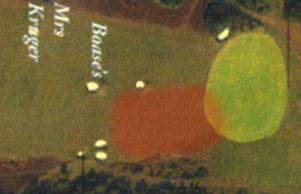
As it stands now, apart from a trio of bunkers about 200 yards from the tee, the right side of the hole is entirely vulnerable. Anything but the most conservative player would drive to the right of Boase’s and End Hole bunkers, over the three bunkers, to a wide, flat landing area (shaded in red above) from where a short pitch, chip, or putt is all that remains. Now I’d be the first to admit that if you can hit an imaginative chip dead near the hole, you deserve to save a stroke. But a flat putt resulting from a chip off a flat lie to a flat green, following a simple tee shot, is not my idea of a fascinating hole.
As such, in an effort to enhance the interest of the hole, I have decided, for the first time to date, to add a bunker. This one will sit about 20 yards front right of the green, or as far as I can tell precisely where you’d most want to hit your tee shot. This bunker will be about 3 feet deep, and the top edge should hide the green.
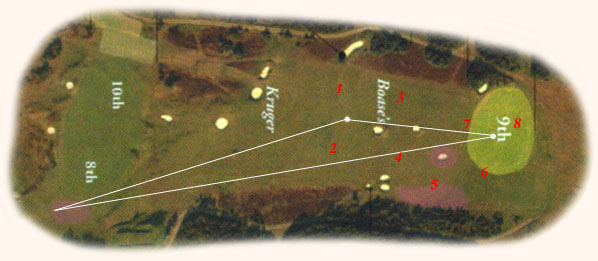
From this point on, I can count no less than eight ways to play this hole (as shown on the plan):
– Stay short of Boase’s, but towards the left of the fairway, where the green opens up.
– Stay short of Boase’s, but this time to the right half of the fairway. This shortens the hole, but you have the new bunker to contend with on you approach.
– Drive to the left of Boase’s for the same angle as in (1.), but a shorter approach.
– Drive to the right of Boase’s, for the same angle as in (2.), but a shorter approach.
– Drive over the trio of bunker in the right rough, and to the right of the new bunker. This should leave a simple chip to the green.
– Drive the green, by bouncing to the right of the new bunker, hoping to catch a corner of the green.
– Drive the green, by bouncing to the left of the new bunker, between it and End Hole, onto the middle of the putting surface.
– Carry everything, as Tiger would do, and land it on the green.
All in all, this is one of those holes where two golfers can get the same score, and depending on each one’s expectation when standing on the tee, can walk off the green feeling as if they’ve lost ground or gained ground. This can have a pivotal role on how they play the back nine, not the least of which is the next hole.
Recommended Revisions
– Construct a new back tee for an extra 20 yards.
– Remove gorse short-right of the green.
– Add a bunkers 20 yards short of the green.
HOLE 10
The back nine of the Reverse Course begins with a 325 yard hole, playing towards the Original eighth green from a new tee complex to the left of the Original ninth green.
As in the previous hole, many golfers will be attempting to conquer this hole in three shots. However, it is no easy task, in large part due to pronounced swales at the front of the green.
There are essentially two entrances to this green, one dealing with heather, the second dealing with the swales. Using a long iron and laying back from the tee short of Kruger bunkers (220 yards away) will leave players with anywhere from 100 to nearly 150 yards to the hole, depending on where it is cut. While this is a conservative play, into the prevailing can be a smart one. It allows the player to hit a short iron rather than a tough-to-judge pitch. The approach would thus be hit with enough spin to stop the ball when the pin is towards the front, or 50 yards of green to work with when the hole is at the back.
Most often, however, golfers will tee off with 3-woods or drivers and go left of the fairway bunkers, hopefully onto a flatter ‘plateau’. When the hole is cut towards the centre of the green, players can then hit a bump-and-run through the throat of those swales, feeding the ball towards its destination. Threes will be more plentiful here. However, if the hole is cut towards the right of the green however, this second shot becomes a more delicate task, rewarding only those with imagination and touch. Indeed, players now must either bump their ball across those swales (preferably landing the ball early) or flop a wedge over them. Furthermore, the farther left one hits the tee shot the tougher becomes the chip shot.All in all, if you’re going to miss your tee shot, miss right. Heather is easier to hit out of than gorse.
Of course, for the power hitters, the opportunity exists to drive the green. It is certainly a big enough target, roughly the size of a football field. However, this aggressive play is a bit of a gamble. Reaching the putting surface all but guarantees a three (assuming a good lag putt), but falling just short will leave the player amidst those swales with a potentially awkward stance.
Finally, it should be mentioned that there are some safety concerns on the Reverse 9th and 10th holes. Unlike play on the Original course, golfers playing the Reverse course will find that the best angle of play towards their respective greens is often from the opposite side of the fairway, in the line of fire from the other hole. But they’ll get in the way when they’ll be in front of the other hole’s tee complex, which means they will see and be seen. Certainly not an ideal situation, but hopefully with a little common sense, and the old rule which states that returning golfers have the right of way, it shouldn’t be any more of a problem than it needs to be.
As an additional remark regarding this green, Alister MacKenzie spoke of theswale in front of the green, which feeds the ball towards the Original 10th green from certain angles in the fairway. Smart golfers would run up this swale, to avoid the high bank fronting the left half of the green. The swale and bank can be seen clearly in the picture above.
Recommended Revisions
– Construct a new complex to the left of the ninth green, trimming gorse bushes as required.
HOLE 11
Honestly, I haven’t made up my mind about this hole yet. And unfortunately, I don’t believe that I can come to a conclusion I can properly defend solely based on pictures and my fading memory about the place.
In theory, the Reverse 11th would play from the existing 9th tee, but I initially believed that it might be a better hole if the existing 11th tee were used instead. In that case, the tee complex will need to be carefully considered, to arrive at a safe arrangement between golfers on the tee of the Reverse 9th and 11th holes, as well as pushed or sliced drives from the Reverse 7th hole. There’s obviously more than enough room between the Reverse 8th green and the Reverse 7th fairway to place two tees facing opposite directions. It’s only their exact placement in the field that would need to be finalized.
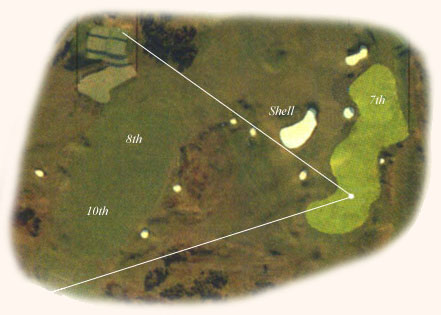
From the existing 11th tee, the hole would measure 160 yards, and represent the course’s best opportunity to post a two or three. It should be easy enough to get a three, as there is nothing really penal near the green. However, it can be quite a challenge to get it close enough to the hole to set up a two.The hole would play from the front portion of the existing11th tee towards the existing 7th green, over the expanse of the Shell bunker and its more discreet little friend to the right, towards a fairly shallow green, but with ample room between Shell and the putting surface proper. Thus Shell is certainly a visually intimidating obstacle, yet it really isn’t much in play for most golfers, except perhaps on the days when the hole plays severely downwind and one’s golf ball expects to be given a good bit of ground from the moment it first touches land to the spot where its run mercifully comes to an end.
But for the high handicapper or for the non-negligible number of golfers for whom a 100-yard carry is still an accomplishment, Shell represents a formidable foe. As such, the Reverse 11th would really be a interesting hole for the below-average player, and would thus be perfectly worthy of praise (not all strategy needs to be designed for the low handicappers…). However, for most golfers there wouldn’t be much to it. A rock-and-roll green, perhaps, but not a whole lot more than that, it would seem.
The more I studied this hole, especially the green complex, the more I began to see merit in using the existing 9th tee. Obviously, other than a negligibly shorter green-to-tee walk, this would free up the slightly congested area to the left of the Reverse 8th green to locate the Reverse 9th tee with greater discretion. However, one would once again end up with a cross-over between Reverse hole 8 and 11.
But what really gave the existing-9th-tee option more interest is a dramatic right-to-left embankment fronting the green, which seems to feed the ball directly into the awaiting mouth of Shell’s little friend. Of course, it is difficult to say whether this little bunker is really set-up properly to catch an adequate number of these timid shots. It almost seems too far out of the way and frankly a bit too small to cause golfers any concern. Yet at the same time it really seems to be the reason why ‘they’ put it there to begin with: A vacuum cleaner for anything that falls short of the green. This would make it quite difficult to get the ball close to any front pin location. And at the same time, one would need to decide whether to hit over or through a ridge running across the mid-section of the green in order to reach back pins. And when the hole is cut towards the far back, there is some rolly ground between Shell’s little friend and the back of the green that may result in odd bounces.
At any rate, whichever tee is used, the Reverse 11th certainly is a legitimate golf hole, even though it may not be the best on the course. It might be a better hole from the existing 9th, although it would probably need to be fudged around a bit to get it set up properly. Exactly how is tough to say, assuming it is even necessary. More than any other Reverse holes, one would really need to play this hole to find out.
And if we can’t choose, there’s no reason why we can’t use both tees. Either way, it’s still going to be tough to top the Original 11th…
Recommended Revisions
Existing 11th tee option
– No revisions necessary, although slight modifications to the tee complex might be suggested for a safe relation with the Reverse 9th.
Existing 9th tee option
– Review the tee complex and adjust as necessary.
– Expand and/or relocate Shell’s little friend to bring it more in play (if necessary).
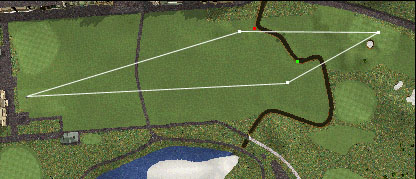
HOLE 12
The 310-yard Reverse 12th hole, where players exit The Loop, represents one of the course’s final opportunity to score a three. And while the best golfers will be disappointed if they fail to do so, writing that number on one’s scorecard is still a moment to be savoured.
Once more, in theory, one would have teed off from the vicinity of the existing 8th tee. However, such a setup is largely impractical. Not because it would produce in itself an unplayable hole (quite the contrary), but rather because such a hole would severely conflict with its close neighbours. As such, in an attempt to keep it in check, players will instead be invited to tee off from the existing 12th tee, from where they would take aim at the existing 6th green.
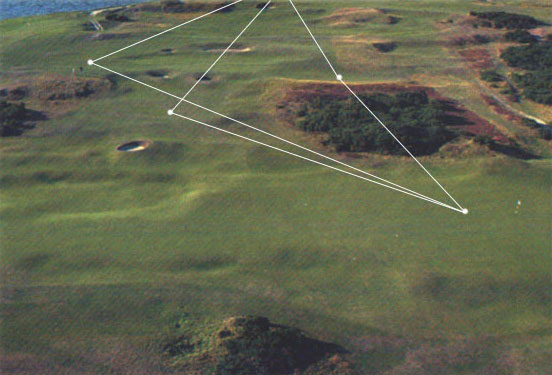
To a certain extent, the Reverse 12th plays similarly to a mirror image of the Reverse 10th. And while it may at first seem obvious that the tee shot would be identical as the existing 12th, it is in large part due to the setup of the green complex that the strategy still makes sense. As the centre of the fairway is infamously a mine-field of unseen pot-bunkers, one has the choice of staying to the right of them, to the left of them, or confidently hitting right over them. The green itself can be reached off the tee, although that would take a very confident poke, to say the least.
The instinctive straight-at-the-green line is to go towards the left, short of a grouping of gorse bushes 220 yards away. While the shortest distance is always a straight line, and a very simple tee shot, this strategy certainly doesn’t leave the easiest of approaches. Even with a wedge, it is still a blind approach to a green sloping severely front-to-back. It can thus be tough to hold the green, and the large swale to the back of the green is no easy up-and-down
Rather than going left off the tee, a better idea might be to aim well right, towards the Eden Course. This certainly opens up the approach, and the flag is now clearly visible. However, it’s a visually awkward tee shot, and significantly lengthens the approach. You really feel as if you are taking a big detour. Aiming well away from the final target is not an easy thing to do when all your animal instincts tell you to let loose and give it an big, aggressive rip at the the green. Brain or brawn on this hole, I suppose.
The compromise between these two extremes is to carry the four fairway bunkers and land to the right of the gorse bushes. While this requires a 225-yard carry, short of driving the green it is certainly the best way to play this hole if you’re behind in the match and gunning for a three. All you’ll be left with would be a 30 to 50 yard bump-and-run, with St Andrews then asking you: ‘How good is your short game?’.
Incidentally, it is well known that the group of fairway bunkers were designed to be seen when playing the Reverse Course. Unfortunately, in this version, this feature is not as used, as the Reverse 7th hole would would the existing 7th tee. It is clear, on the overhead map, that it would be very dangerous to use the existing13th as the tee for the Reverse 7th.
We are also, with this hole, returning to the more rolling grounds of St.Andrews. It is indeed quite curious that the first, eighteenth, ninth and tenth, along with the Elysian Fields, are so flat compared to the rest of the property.
Recommended Revisions
– No revisions necessary.
HOLE 13
The last divergence between theory and practice occurs on this hole. Rather than playing towards the existing 5th green, it would instead be wise to keep the green configuration as is, and use it both for both the existing and Reverse 13th.
Teeing off from the existing 7th tee, the Reverse 13th hole will actually be roughly 40 yards shorter than the existing 13th hole, thus measuring around 360 yards. This is in large part due to the fact the the existing 7th tee might also be used for the tee of the Reverse 7th. Having to keep golfers out of each others way, they couldn’t be moved too far back on their respective tees. However, as another example that length has nothing to do with quality, this shortening of the 13th creates a rather interesting setup for the drive, one that will dramatically differentiate the two 13th holes, and one that offers an good lesson about the game.
Cat’s Trap is the key feature of this hole, sitting patiently 230 yards from the tee.
For most golfers in most situations, the smart play is obviously to stay short of Cat’s Trap, with a long iron or metal wood, into the wide section of fairway to the left of the Coffins. From that point, they will be left with anything from 100 to over 150 yards for their second shot, with a good view of the huge green. All in all, while being a perfectly good hole, it’s not the most fascinating one on the planet, as the entire interest lies in how close to the hole the player can hit her approach.
On the other hand, for the adventurous lot, flying it over Cat’s Trap is not entirely out of the question, especially when the hole is towards the back of the green. While doing so requires a ‘damn the torpedoes‘ approach towards the game, with a bit of luck the reward can be a simple pitch or chip to the hole, where a three is the likely result.
The second strategy is an interesting one from the point of view of luck, control, and the spirit of the game itself.
The area beyond Cat’s Trap is fraught with sharp tiers, pockets of rough, heather, fairway, a pot bunker, and Lord knows what else. Essentially, using your driver off the tee means that you are willing to relinquish control of your game, and rely on luck and a good bounce to help you along. While you have no idea where the ball will finish, and what kind of lie you’ll have, you’re willing to roll the dice. And although you’ll need luck to get a perfect lie, at the same time you’ll also be rather unlucky to get an unplayable lie as well. It’s really the golf equivalent of a slap shot from the blue line. Shoot it towards the net, and see what happens: you never know where it might deflect.
Interestingly enough, this is precisely the sort of strategy that is virtually eliminated from the modern game. When we usually think of a gamble, we think in terms of the golfer’s ability. Yes, it is a gamble to reach the 15th at Augusta in two shots, but if the golfer hits a good shot, we assume he should be rewarded. We believe that there should be a direct relation between execution and result.
Yet in this case, the gamble is not about the golfer’s ability. A good golfer knows that he can clear Cat’s Trap. Rather, the gamble is about the golf course itself. It is to see where two equally good drives will end up. The question is to see what the golf course will give the golfer. The test is to see how the each player will react after a voluntary loss of control and seeing the end result, good or bad.
The lesson is to accept that Luck is a integral and valuable part of the game.
Recommended Revisions
– Adjust the tees as necessary to allow for possible double use (Reverse 7th and 13th).
HOLE 14
The fourteenth is the longest hole hole of the course, measuring 570 yards from the back tee. And while I was both hoping and expecting this hole to be one of the most strategic and interesting of the Reverse Course, the truth is that all its potential falls flat when studied more closely. In reality, mainly due to the setup of the green, the shots are very one-dimensional, with hazards pushed away from the line of play and a fairly free, direct route to the green available. Of course, this in itself does not make the fourteenth a bad hole, far from it. However, with all the features found from tee to green, one cannot help but be disappointed at the outcome. And, as such, one is very tempted to do something about it.
And so I will.
There currently sits a pair of pot bunkers in the neck between the Reverse fourth and 14th greens. These, I believe, have a very minor role in the playing of the Old 14th, yet essentially spoil much of the strategy for the Reverse 14th. They make the approach easier from the mostly hazard-free left side of the fairway, and punish the golfers that challenge Hell.
As such, I thought that shifting them over towards the front-left of the green, would breathe new life into the interest and strategy of this hole.
Teeing off from the area Old 6th tee, the drive must challenge a bottleneck at 250 yards from the tee, between a sharp tier to the right and gorse to the left. Staying short of this pinch makes it quite difficult to carry Hell on the next shot, while confidently hitting through that gap allows the good player to attack the hole.
The decision to be made for the second shot is whether of not to carry Hell, about 200 yards away (give or take 50 yards, depending on your drive and the wind). For the long hitters, this task is probably so simple that they would be quite tempted to go right at the green and make a four.
But for most mortals, carrying Hell is still a challenging shot, and a very intimidating one at that. Yet the reward is a clear view of the green (now that the two pot bunkers are pushed out of the way). On the other hand, punching your second shot down the left side will then force players to clear the green-side bunkers on the approach, which is an especially delicate task when the pin is towards the front. Actually, staying left on the second shot is not an entirely straight-forward shot, as a series of mounds give good roll to the landing area. (In the area highlighted in yellow) One could thus stay short of them, roll through them, or not worry about them and rely on luck to give us a good stance.
Finally, off the tee, it must be mentioned that there exists another option of hitting over the Beardies into the Elysian Fields. While this may seem pointless at first, it does guarantee a flat lie, and opens up the green quite nicely for the long hitters going for it in two. Just make sure no one is putting out on the Reverse 5th before going that way
As a matter of fact, comparing this hole to the play of the Reverse 5th hole, and when one realises that such line-of-play overlaps between outward and inward holes exist throughout the Old Course and the Reverse Course, one cannot help to wonder how and why someone hasn’t been killed yet. Honestly.
Recommended Revisions
– Adjust the tees as necessary. Potential exist for a back tee back in the gorse somewhere.
– Relocate two greenside pot bunkers towards the front left of the green.
– Add fairway in area to the left of Graves bunkers. Tiers and mounds short-left of Graves could remain as rough, though.
HOLE 15
The fifteenth is perhaps one of the best of the Reverse Course.
Measuring 440 yards, this hole features a sharp fall-off about 275 yards from the back tee, splitting the landing area into two separate tiers: a narrow, lower section to the left, and a generous, inviting area up above.
Staying on that higher plateau to the right certainly seems to be the shot of choice off the tee, and overall is probably the smartest, safest way to play the hole. The landing area is 75 yards wide, and most thankfully, for once, hazard free (at least not counting Sutherland and Rob’s). In fact, a flat shelf towards the left half of that upper plateau seems to say ‘hit it here’. Doing so really is the best play.
However, nothing is free in this world, and if something looks too good to be true…
The catch, in this case, is that the further right you drive, longer and the tougher becomes your approach. Indeed, a menacing pot bunker guards the front right of the green, as you can see in the picture above. Of course, when the flag is towards the back of the green, there is still a good amount of room to carry the bunker and roll up to the flag.
To ease your predicament for your approach, you’d be well advise to stay left as much as you can. And, when you’re playing well (or playing so poorly that you need a three to stay alive), driving down the 20-yard-wide lower chute to the left offers a much better view of the green, even though some tricky contours might still need to be negotiated at the front left of the green.. When the flag is tucked behind the green-side bunker, coming in from this angle is by far your best opportunity to hit it close.
All in all, the location of the flag plays an important role in determining the best route off the tee. There are some areas of the green that can be very easy to reach from one landing area, but next to impossible to reach from the other. Roughly speaking, back and back-right are perhaps the only areas of the green that can be easily reached from the upper-right landing area. A very tricky green marks the end of a fascinating hole.
Recommended Revisions
– No revisions necessary, although some of the rough in front of the green could be shaved back.
HOLE 16
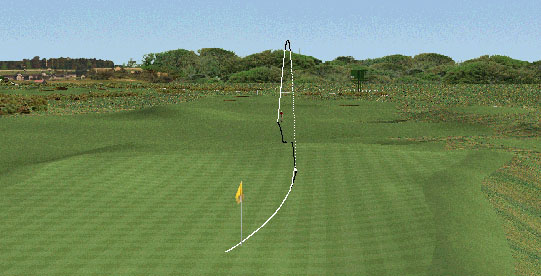
At 380 yards, the sixteenth hole is a rather simple hole, yet a tricky one nevertheless. The green is perhaps the most contoured at St. Andrews, and can greatly affect not only the putts, but also the approach shots as well.
Essentially, off the tee, the line is basically anywhere between the 2nd and 16th flags. But as it so often happens at St. Andrews, while the centre of the fairway is safe off the tee the result is a tougher approach, whereas flirting with the edges of the property offers a better angle in. Here, a large mound (topped by a gorse bush) blocks the view of the green from the centre of the fairway and impedes the approach.
Of course, the rough short of the green should be shaved down, as it should be on many other holes on the Reverse Course because it surely used to be a fairway that has simply been overgrown over the decades. However, the gorse bush could certainly remain. Not only does it have strong visual presence, it is a good aiming point off the tee.
For the golfers who stay left off the tee, the approach is more open with the right-to-left slope of the green facing towards them. Furthermore, the ladies’ tee of the Old Course’s third hole offers an flat landing pad on which to land the ball before having it run onto the green. However, in doing so, the golfer will need to flirt quite closely with a large, blind pot bunker about 270 yards from the back tee. The best strategy is often to stay short of it, and come into the green with a full short iron..
The real trick of this hole seems to be the semi-blind approach. In effect, the sixteenth, while shorter, is quite similar to the previous hole: A tricky green best approached from the left side. And while the putting surface cannot be seen, the player knows all about its hidden dangers, having seen it on the way out. What frightens us most is often that which cannot be seen.
As a final note, I’m curious as to the origin of those two linear drainage swales that look like tire tracks for the Green Giant’s maintenance vehicle. They start in front of the Reverse 3rd green and traverse diagonally in front of the Reverse 16th landing area.
It was also mentioned that an option of play is to drive far left onto the New Course, and thus face the inviting upslope of the green. This option should be discouraged, as it is quite dangerous and seems to defeat the purpose of the hole. Thus the heather, gorse bushes and pot bunkers along the left, near the maintenance road, should remain as a stern buffer between the Reverse Course and the New Course.
Recommended Revisions
– The rough in front of the green should be shaved back or eliminated altogether.
– A new back tee could easily be built for the long hitters / pro players, lengthening the hole by a good 40 yards.
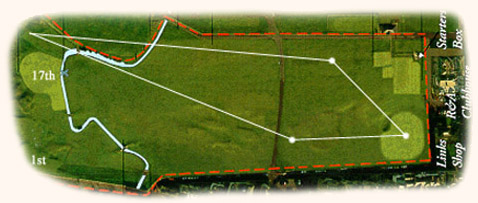
HOLE 17
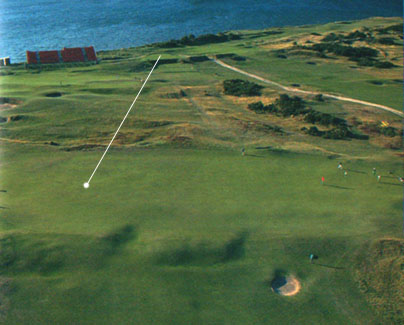
The second to last hole of the Reverse Old Course — a hole where it is likely that many matches will be decided — offers a generously wide, 440-yards-long battlefield. The important decision I had to make was how long to make this battlefield. Too long, and Cheape’s comes increasingly into play. Too short, and the second shot is no longer one of sheer terror.
Essentially, the interest of the second shot is dictated by three features: a large mound front-right of the green, a green that falls away from you, and the Swilken Burn. So it doesn’t take a great strategic mind to understand that an approach from the rigth side will be tremendously difficult: A semi-blind long iron, all carry to a green falling away from you and water hard against the back edge.
Good luck!
The reason why I did not want Cheape’s to be in play is that I wanted the right side of the hole to be a bail out for the timid drives. As I have it, it’ll be a 210 yard carry from the back tee.
So once again, therefore, the aggressive play from the tee is to hit it down the property line, in this case along the left side of the fairway, flirting with the gorse and a trio of pot bunkers. From this side, however, players will have a better view of the green, a better angle in, and a shorter shot. In fact, the approach no longer needs to carry the large mound, and could thus be run up onto the green, once the rough is trimmed back. Furthermore, overshooting the green does not necessarily spell disaster, as the water is now more to the left of the green rather than directly behind it.
It is interesting the way that the Swilken Burn, so close to the green but behind rather than in front, still has the same effect on golfers approaching the Reverse 17th as when playing the Old Course’s first. But in this case, instead of screaming ‘Go ball! Go!’, they’ll be pleading ‘Stop ball! Stop!’.
Recommended Revisions
– Construct a new back tee 50 yards front-left of the Reverse 16th green.
– Shave back the rough in the area highlighted in purple. This will also improve play of the Reverse 2nd hole and Old Course’s 17th hole.
HOLE 18
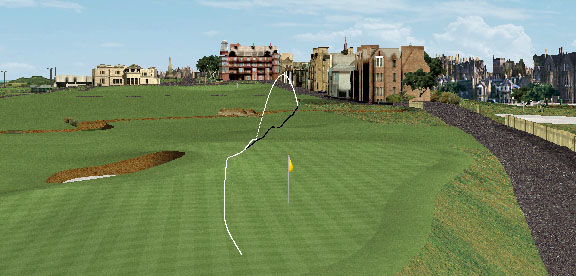
The 18th hole of the Old Course has long been an important question mark for golfers and architect aficionados alike. Indeed, it is certainly unconventional — some might foolishly say anti-climatic — in that it doesn’t heed to the more common idea of the ‘difficult finale’. However, it remains a hole where a player can easily score a three and thereby gain a stroke on his opponents. And certainly the return into the amphitheatre formed by the ancient town of St Andrews is not likely to be forgotten. Those who have crossed the Swilken Bridge and made that walk into the heart of the ‘Olde Grey Toon’, under the watchful eye of the local gallery, will rarely describe the Old Course as a mere sports field.
Yet those last few shots must still be hit, and off the tee players, hitting across the line of the first hole, are once again faced with a number of choices. These choices will partially depend on what score the player wishes to post on this hole, but mostly depend on the location of the flag.
For those find themselves ahead in their match, and who want to avoid a five at all costs, the best play can be described — as it always is — as two middles and two putts: Middle of the fairway, middle of the green, lag it close, and tap it in. Most times and in most situations, this is the best and smartest play.
On the other hand, for those desperate golfers who are trailing by a shot, the placement of the drive should dance with the location of the hole. Left when left, long when long, short when short, and right when right.
The setup for the tee shot is essentially to avoid the Valley of Sin on the approach. In effect, the Reverse 18th plays quite similarly to the existing 18th, for obvious reasons. When the hole is cut on the left side of the green, the drive should be aimed towards the first tee, as far down the fairway as possible. This will allow the approach run on to the green from that side, passing by the Valley. Along the same line, when the hole is (more rarely) towards the severely-slopped right side, players might wish to aim across the width of the fairway and towards the right half of the corridor. However, that side is certainly more bumpy, producing uneven lies that can ruin a realistic run at a three.
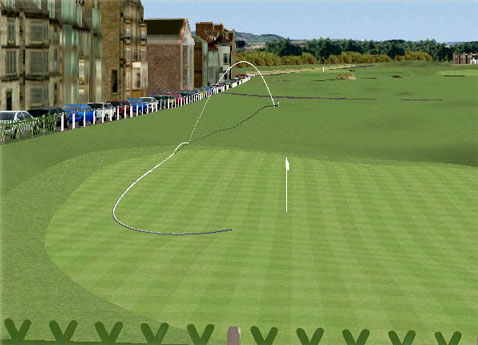
Of course, if the pin is towards the back of the green, players can then take dead aim and hit it down the middle with their driver. They’ll have plenty of green to work with, and the Valley of Sin won’t be much of a factor. They can pitch it quite close to the hole. And finally, when the hole is cut to the front, players may wish to stay back a bit more on their drive. While they can run it through the Valley of Sin, this play will also give them a choice of hitting it over the valley with enough spin to stop it reasonably quickly.
When the last putt has fallen, players are invited to share a Pint at their favourite pub, and debate the merits of the Old and Reverse courses.
Recommended Revisions
– No revisions necessary.
CONCLUSION
So there it is, the Reverse Old Course. We’ve done the unthinkable, and revised the Grand Old Lady, to re-create a golf course that had been lost for generations.
When we embarked on the journey, we had two goals in mind. The first is to see if the Reverse Old Course is a legitimate golf course, and not some awkward, dangerous contrivance that is basically unplayable. Truth be told, a ‘pure’ Reverse Course, due to the setup of The Loop, fell short of this goal. However, once the routing of the Loop was reviewed, the end result, as we can safely conclude, is a perfectly playable golf course. The second goal was to discover just how good a golf course the Reverse Old Course was or could be. I’ll let you answer this for yourself, but rest assured that next time I go to St.Andrews, I’d be quite tempted to aim a little more left off the first tee.
Yet the question remains: Why has the Reverse Course disappeared? Just what are we waiting for to revive it? After all, it is a true diamond in the heather, one ofthe greatest ‘lost’ links of all.
It lies in waiting; like an old musical instrument yearning to be dusted off and played again.
Credits
The overhead aerial plans of each hole are taken from the Old Course’s yardage book, which I purchased when playing the Old Course. It is provided by the St. Andrews Links Trust.
Other pictures are taken from both St Andrews: How to Play the Old Course by Desmond Muirhead and Tip Anderson; and St. Andrews & The Open Championship: the Official History by David Joy
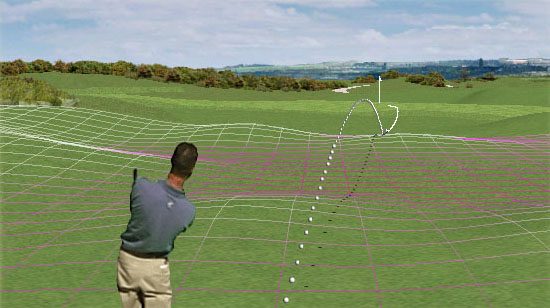
Golf simulation screenshots were made with the use of Links LS 99 (for the front nine), and Links LS 2001 ( for the back nine).
The End